Showing posts with label DIY. Show all posts

Monday, April 30, 2012

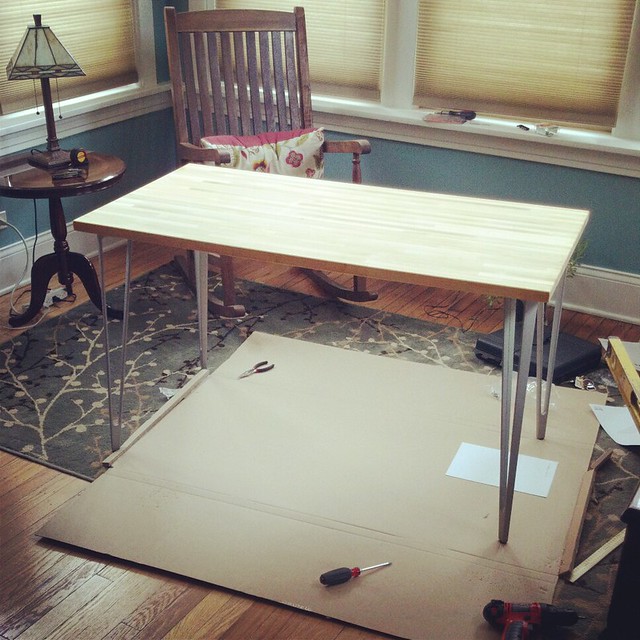
Ikea wood countertop with Vika legs

We were looking for a smaller desk for our guest bedroom/office and found this great DIY project in Apartment Therapy. We liked the looks of it and for the price it was hard to beat. However Ikea had a surprise for us, both the Pronomen countertop and the Vika Inge legs had been discontinued and, while you can find the Lagan countertop (which looks identical to the Pronomen, makes you wonder if the folks at Ikea just changed the name), the Vika Inge legs are nowhere to be found. We really liked the look of the hairpin legs on the desk, and while looking for alternatives found a great selection on hairpinlegs.com. Their products are really nice but out of our budget for this project. We also looked on Ebay and then got lucky on craigslist, someone that lives literally blocks away from us was selling four used Vika Inge legs. I guess you can call it serendipity, these legs where just posted on craigslist that same day and cost us only $15! Another good thing that happened is that, while the guy selling the legs only had the legs and not the mounting plates, we were able to get in touch with Ikea and they sent us the parts we were for free (and from Sweden!).

Putting together this desk is quite easy, these are the steps we followed:

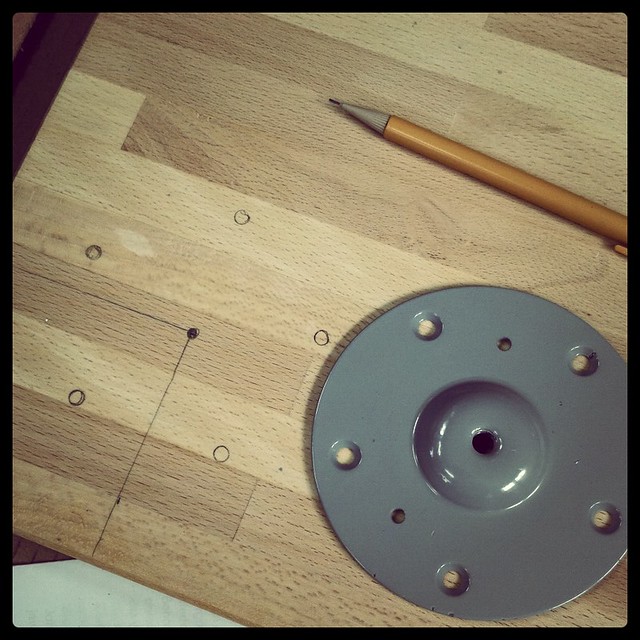
First you need to install the four mounting plates. We decided that we were going to place the center of the mounting plate three inches away of the borders. After you have that mark, using a mounting plate you can also mark the holes where the screws that will hold it will go.

Solid wood desk - Step 1: Measure

Solid wood desk - Step 2: More measuring

After that, we drilled the holes using a 1/8" bit. Make sure you don't drill too deep, this is easy to avoid by marking the desired length in the drill bit with a sharpie and not going any further than that.

Solid wood desk - Step 3: Drill

Screw the mounting plates and then the legs. Hopefully your drill doesn't suck as much as ours and your batteries are not out of juice yet...

Solid wood desk - Step 4: Screw

In order to protect the desk and cover up a couple imperfections, we decided to give it a couple coats of Minwax finishing wax.

Solid wood desk - Step 5: Wax

The final product:

Solid wood desk - Step 6: Enjoy!

The total cost of this desk was $55, I know we got lucky with the legs and that drove our cost down, but even if we would have had to pay more for it, the desk feels rock solid and in our opinion looks better than anything else that you can buy in the less than $75 price range.

Wednesday, May 25, 2011

color swatches

Time for me to share a secret. A secret talent I wish I had, so that I could have made a career out of it. This time, no, it is not having one dominant artistic talent so I could live strictly off my creativity. I am convinced after all that this may not be the life after all.

I wish I was an expert at the color palette. Admittedly, I do have better skills than many. I can tell the distinct difference between colors -- which have more browns, reds, yellows, blues, etc. Although even with this, it's not enough to cut through the color and identify what would look best.

As per the photo, we're in the midst (correction: I am in the midst, and pm has given me all decision making capabilities on color--as long as it is not red) of choosing colors for the walls. We had a couple of easy decisions.

I always wanted a green bathroom. After 30+ color swatches and evaluation, we got that project done. Since then, we've only done one other wall and it was just the accent wall. My next project entails painting an accent wall in the kitchen. The larger project tying into this is painting the hallway.

I know that I want for the colors to be rich, but not overbearing. We have a very well lit kitchen. We've already got reds, blacks, greens, purples and beige. This got me thinking in the direction of yellow. Blue and green (in my opinion) are too chill for a kitchen. Since the party almost always starts and finishes in the kitchen, it has to be a color that evokes energy. Since red is out of the picture, I am leaning toward yellow.

I took an inventory over the weekend of the paint swatches to date I have collected. It is ridiculous. How hard is it to make a decision? Well, hard. I know it's just paint and you can just repaint it again if you decide you don't like it. I am perfectionist people -- I want to do it right the first time and get it right the first time.

My master plan is to make some decisions this weekend so that more paint can go up on the walls. I have a few tricks up my sleeve to help me make decisions:
  1. The paint color must have a food name. To date, we've used "Pistachio Ice Cream" and "Italian Roast" (I am personally leaning toward something with coconut :))
  2. Label my favorite colors with numbers. Ask pm to select a random number.
  3. Have you vote. I could post the colors, and you could vote.
  4. Don't paint this weekend. Ponder more...
And, so there it is. I wish I was a colorologist. With that, I wish I could just make a decision. It's just paint, right?

Saturday, May 21, 2011

DIY: China Cabinet

If we've learning anything through our more recent home ownership, it's that there's always a project on the sidelines.

We went from nearly no furniture to an immediate need for more--mostly so that we could store the many items that were packed safe and sound at the 'rents house. Owning property has expedited the lease on that free storage space.

Our first big DIY project stemmed from the need for more kitchen storage. While our new kitchen has plenty of cabinets, with a 10+ foot ceiling, not all cabinets are conveniently accessed or useful.

pm and I decided to start our search for a china cabinet. We wanted something that would be big enough to hold a good portion of our kitchen wares (p.s. it's amazing how much kitchen stuff you get from your wedding that you ultimately do not use unless you have the space to accommodate it). We started our search by going to the usual suspects--Crate&Barrel, Ikea, Target, World Market, etc. No luck. There were very few china cabinets that fit our style and our budget.

On a random Monday night we decided to stop off a local thrift store. This trip was made more to donate old clothes, than it was buy anything. Turns out: Once we walked in we discovered an amazing china cabinet (with character!) that fit the bill for what we were looking for our kitchen space. The cabinet (as pictured) was in great shape, but needed a modest amount of TLC. (We later discovered that it would need more than a modest amount of TLC, but I digress...)

Nearly 2 weeks after the purchase--plus 3 coats of paint, sanding, waxing and reconstructing--we could hang our towels and toast to a china cabinet that was truly ours. It's nice to know that the piece we ended up getting not only goes well in the space we designated for it in the kitchen, but it also is an original. No one else will ever have one just like it. This fact makes us proud (even if it was a pain the butt to do when we were in the process). What may make us the most proud, however, is that the whole project (cabinet, paint, etc.) cost us under $300. A small price to pay for what we were looking at in all stores.

So here was the whole DIY project timeline:
  1. Find china cabinet and purchase it.
  2. Move it to the house. (aka: Hire strong men to move it to the house)
  3. Remove all hinges, screws, glass and other hardware.
  4. Clean it, bleach it, clean it.
  5. Sand it. Sand it. Sand it.
  6. Prime time. We primed the whole cabinet with an oil based primer.
  7. Paint cabinet, drawers and details in white with a latex paint.
  8. Paint drawers with green accent latex paint.
  9. Patiently wait for all paint to dry.
  10. Wax. (Minwax, finishing wax in natural)
  11. Add all hardware and glass back to the cabinet. (we found the knobs at Ikea--of the snodd variety)
  12. Fill cabinet with kitchen items.
  13. Blog about it.

Not exactly sure what our next big project will be in terms of furniture. That said, we're experimenting with different paint options for the hallway.

Never a dull moment. Never a project undone. :)

Tuesday, January 25, 2011

DIY Dinner: Sausage

We recently said one of our goals this year was to be more aware of what we are eating and where it is coming from. Well, today that goal has been achieved. (This does not mean that we will stop now that we are ahead.)

Tonight we made homemade sausages for the first time. pm recently bought the meat grinder attachment for our kitchen aid. I think that we have used it more for meat in the past couple of months than I ever used it for sweets. This too will change my friends...

We made a basic sausage -- pork, onion, garlic and various spices (italian seasonings, paprika, etc.) They turned out really well. Plus, I think when compared to what you'd spend in the grocery store for good sausages, we saved ourselves some money.

There was no mystery meat in these bad boys. In fact, making these made me realize just how much we probably are not aware are in "store bought" sausages. I'd rather not think about it. And, the plan is not to think about it, because we plan to make a lot more of our own homemade meats from locally grown and farmed meat. We'll be supporting our local butcher (Paulina Meat Market) and eating more healthy. A win-win all around.

Sunday, October 24, 2010

Oriental Amber

OG 1.052

It's 10:30a.m. on Sunday morning and this has been our morning agenda:
  • Brew coffee, drink coffee.
  • Eat breakfast.
  • Sanitize beer equipment.
  • Wash dishes.
  • Clean kitchen.
  • Begin brewing process.
  • Scan photos.
  • Listen to NPR.
  • Brew.
  • Clean kitchen.
  • Wash floors.
It has been a busy morning. We woke up this morning on the creative side of the bed. (Beer translation: Instead of following a recipe book or using a kit, we decided to make our own experimental amber ale.)

We have loads of tea and have enjoyed adding it to our brews. (Past batches have included: hibiscus green tea wheat, sangria tea ale & white tea steam). Today we decided to go with an oriental tea straight from the non-homelands of Germany (Rotbuschtee Orientalische).

Without further ado here is the recipe. (Please note: This is an experimental amber, and while we are confident it will turn out delicious, we aren't making any promises :)).

1 lb. crystal medium
6.6 lb. amber malt extract
.5 ga. Rotbuschtee Orientalische tea (steep apart from wort until very strong & add with boiling hops)
1 lb. honey (add with finishing hops)
1 oz. amarillo hops (boiling)
1 oz. cascade hops (finishing)
1056 American ale liquid yeast (Wyeast)
OG: 1.052

Do let us know if you have any questions. We'll be sure to post our review of the final product in the months to come.

Tuesday, September 7, 2010

back to the swing of things.

Swing

Why is that long weekends always go by the fastest? We were just starting to get comfortable and along comes Tuesday. Someone needs to invent a remote control for life already. Well, not really. It would sure be nice sometimes though.

This was the weekend of family & friends, projects and crossing things off the to-do list.

Projects.
Pm kept busy for most of Saturday refinishing a bench of ours. He dusted it off, sanded it down and varnished it. It looks pretty awesome, and photos will be posted once the entire project is complete. This may first require us learning how to upholster furniture. More to come on that.

Projects & Family.
Sunday we shot some engagement photos. We have yet to do some post-processing and waiting for the film to be developed, but I am hoping we'll get some goodies. We'll be back for a repeat visit with these two. It helps when it's family and they are up to putting in a few more rounds of good smiles.

Friends.
Meanwhile, while the above trunk project was happening, I caught up with some dear old pals. Nothing like being reunited with friends from yesteryears and being able to laugh about then, now and what's to come. My one pal has a way cute house. Makes me want one of my own. Patience, am, patience...

To Do List.
Restock the shelves... with beer. It has been a long, hot summer of not brewing. If you've been following the blog you know that it's because our apartment hasn't been the coolest place to hang out this summer. Heat and beer brewing don't really go hand in hand, so we decided to wait. Until... this weekend. We are brewing a Peach American Wheat. Should be ready to enjoy in a month or so. We just have to add the fresh (and now frozen) peaches. I'm thinking an IPA is next. Maybe in a couple of weeks?

And there we have it. A fun-filled weekend. It was just long enough to get refueled and re-energized, and not quite long enough to completely catch up on everything. That includes sleep. I shall do that now.

Saturday, July 3, 2010

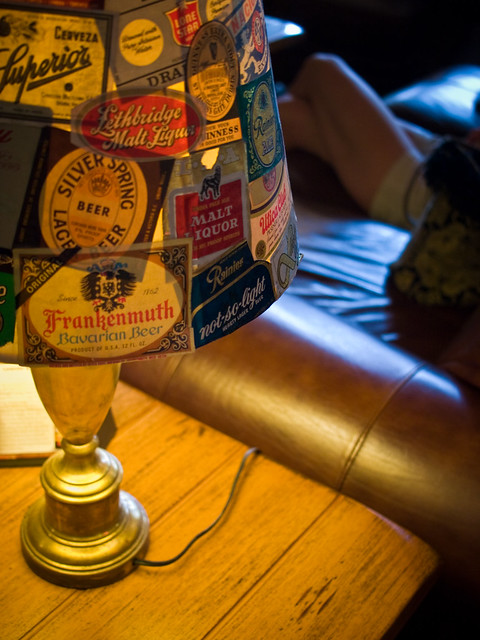
DIY: Beer Light

Beer Light :)

Do you like beer? Do you like decorations that involve beer? Yeah, I thought so.

I saw these lamps at the Leinenkugel Lodge not too long ago and thought they were interesting. I also looked at the price and realized it would be easy to do something like this on your own for much less. Lamps are an easy dig at any thrift or resale shop. Collecting beer labels to add to the lamp shade is equally easy, if not easier.

Someday when pm and I have a cabin, it will be adorned with these lamps. (I can't even write that with a straight face, but one can dream, right?). Maybe instead of the cabin a basement would work. This would be a perfect addition to when we get a tap as well. Here's to hoping!

Monday, May 24, 2010

New collection.

It seems like it has been awhile since we posted photos of our creative endeavors. Don't be deceived - we still have been using our creative powers to make things; we just haven't been very good about sharing them.

I have been humming away at my sewing machine a lot lately. I've been making all sorts of envelopes (mostly black like in this past post). I've used various different thread colors and have also been experimenting with different sizes.

I am still undecided if I will actually try to sell any of these envelopes, since it takes me a good 20-25 minutes to make one. (That's if my sewing machine behaves!) Not sure I could price them in such a way that someone would actually want to buy one. Maybe they will pop up on our Etsy page soon, so stay tuned.

Anyway. I needed a solution to a problem I know many of us suffer from. Too many bags! I am always trying to use reusable bags when we go out shopping. I do this partly because we have more than enough plastic bags to use for the garbage for the rest of the year and I think it is a huge waste to always need a *new* bag. The area for "bag storage" under our sink was getting a little overwhelming. That is when I decided to make some envelopes out of brown paper bags.

These envelopes are surprisingly durable. I like how some of the bag graphics peak out of the top (like in the photo on the right from a Trader Joe's bag). I am working right now on a design to match for stationary. Once that is complete I will get more photos up.

This has been a good solution to an excess of bags. It's also been a fun recycling / up-cycling project. Sometimes you have to think outside of the box and sometimes you need to think outside of the bag.

Monday, March 23, 2009

A case of the Mondays...

Monday snuck up again; after all, it was a busy weekend. In fact, it was a very busy DIY (do-it-yourself; and yes, you already knew that!) weekend, as we successfully bottled two home brews: Chocolate Bock & Smashing Amber Ale.

We did the chocolate bock first, and without having done this one first our amber never would have even been named. It would have just been "amber ale." The bottling of the amber turned out to be glass shattering event.

We have a real system down with bottling. AM does the siphoning and pouring into bottles, and PM does the capping. (The capping takes more strength; the pouring more patience.) Two of the bottles must have had weak necks, otherwise the strength we gained from the chocolate bock was just too much for two said bottles. Lucky for us no one was injured. Unlucky, however, because we lost four bottles of the brew.

*s*

So hear I find myself on a Monday wondering what the next brew batch should be. Any suggestions? :)

Anyway, I have a case of the Mondays; and we have more than one case of home brews. Guess life could be worse. :)